On-screen keyboards are such a pain in the butt. Fortunately, the Verizon FIOS remote app has a way type on the cable box’s on-screen keyboard through the iPhone’s keyboard. And Apple’s Remote app has a way to use the iPhone’s keyboard to type on the AppleTV’s on-screen keyboard. But unfortunately, the Remote app doesn’t seem to want to type when using XBMC on my jailbroken AppleTV. It is so frustrating using the on-screen keyboard to type in a search term! Right, right, right, right, down, select. Left, left, up, select. Right, right, right, down, down, select. NO! Wrong key! Right, right, right, down, down, select to delete. Left, left, left, up, select. What a pain! There has to be a better way! Introducing…. the On-Screen Keyboard plugin for Indigo!
Watch this video to see the On-Screen Keyboard plugin for Indigo in action. (coming soon)
Installation
The latest version of the plugin can be found here: OnScreenKeyboard.indigoPlugin
Version 1.0 – 12/4/2013 – Initial Release
Download the zip file and expand it on the Mac that you have Indigo running on. When you double-click the expanded plugin file, it should install into Indigo automatically. Navigate to Plugins -> On-Screen Keyboard -> Enable.
Set Up
A little pre-work is required for the On-Screen Keyboard, but if you already have Indigo controlling the device that you need to use an On-Screen Keyboard on, then you are probably already prepared to begin setting up your own Automated OSK.
In order to use an OSK, you need to use five basic functions on your remote: Up, Down, Left, Right, and Select. So, for the OSK Plugin, you need to have an Action Group configured for each one. As long as the Action Group “pushes the button”, the Plugin doesn’t care how the button actually gets pushed. Your Action Group could send a network message to the device, or it could do what mine does, and send an IR Blast to the device.
Once your Action Groups are configured, you are ready to create your OSK. Under Devices, click “New…” Choose Type: “On-Screen Keyboard”. Under Model, if you are creating an OSK for XBMC, simply choose “XBMC On-Screen Keyboard” – I have pre-configured the OSK for XBMC. If you need to control an OSK other than for XBMC, choose “On-Screen Keyboard”.
Note: To simplify the OSK setup for XBMC, I have hidden all of the details of the pre-configuration. For this guide, I will explain how to create an OSK for XBMC from scratch.
After choosing the Model: “On-Screen Keyboard”, the configuration dialog will appear. At the top of the config, you will be presented with your choices for how to navigate UP, DOWN, LEFT, RIGHT, and SELECT. For each choice, select the Action Group that is responsible for performing each of these actions.
The next section allows you to define the Variable that you wish to have the OSK “type”. You can choose a variable that you have previously created, or directly from the configuration dialog, you can create a new one (or even delete an existing one). I named my variable “xbmcKeyboard”.
The next part is the meat of the configuration. This is where you define the layout of the actual OSK. On your actual device, bring up the OSK. The keyboard layout that you are looking at first will be called the “–OSK1–” layout. This title is already pre-populated in your OSK definition (and can not be deleted or changed). Other keyboard layouts could include capital letters, special characters, number keys, and more.
The XBMC keyboard is eleven keys wide and five keys high. Each key needs to be separated by a space. I have defined the first row as:
DONE 0 1 2 3 4 5 6 7 8 9
The “DONE” key is a special key. We can call it anything we want, but it stands for the key to press when we are done typing on the keyboard. You will define this key later in the config.
The second row:
[--SHIFT/OSK1--] a b c d e f g h i j
The “[–SHIFT/OSK1–]” key definition is an instruction to change to the SHIFT keyboard layout, and return to the OSK1 keyboard layout after the very next keypress. (On XBMC, the first keyboard is all lowercase. Pressing SHIFT will display the uppercase keyboard. After choosing an uppercase letter, the keyboard returns to the lowercase keyboard.)
The third row:
[--CAPS--] k l m n o p q r s t
The “[–CAPS–]” key definition is an instruction to change to the CAPS keyboard layout (and stay there).
The fourth row:
[--SYMBOLS/OSK1--] u v w x y z [BACKSPACE] [BACKSPACE] [BACKSPACE] [BACKSPACE]
The “[–SYMBOLS/OKS1–]” key definition is, again, an instruction to change to the SYMBOLS keyboard layout, and return to the OSK1 keyboard after the very next keypress. Now, the keyboard on the screen only shows one BACKSPACE key, but since the keyboard needs to be eleven keys wide, we need to define four BACKSPACE keys to keep the width the same.
The fifth row:
[--IPADDR--] [SPACE] [SPACE] [SPACE] [SPACE] [SPACE] [SPACE] [LEFT] [LEFT] [RIGHT] [RIGHT]
The “[–IPADDR–]” key definition would take us to the IPADDR keyboard. You’ll see later that we don’t bother defining this special keyboard, but we need to define the key anyway. “[SPACE]” is a reserved key name, and defines a space. Notice how there are many [SPACE] keys, as well as two [LEFT] and two [RIGHT] keys. Again, the multiple keys are defined to preserve our keyboard width.
This completes the primary keyboard layout. Now we need to define the other layouts for this keyboard, starting with the SHIFT/OSK1 keyboard.
--SHIFT/OSK1--
DONE 0 1 2 3 4 5 6 7 8 9
[--OSK1--] A B C D E F G H I J
[--CAPS--] K L M N O P Q R S T
[--SYMBOLS/OSK1--] U V W X Y Z [BACKSPACE] [BACKSPACE] [BACKSPACE] [BACKSPACE]
[--IPADDR--] [SPACE] [SPACE] [SPACE] [SPACE] [SPACE] [SPACE] [LEFT] [LEFT] [RIGHT] [RIGHT]
Pretty much the same as the OSK1 keyboard, but with uppercase letters.
--SYMBOLS/OSK1--
DONE ) ! @ # $ % ^ & * (
[--SHIFT/OSK1--] [ ] { } - _ = + ; :
[--DONOTUSE--] ' " [COMMA] . < > / ? \ |
[--OSK1--] ` ~ [--DONOTUSE--] [--DONOTUSE--] [--DONOTUSE--] [--DONOTUSE--] [BACKSPACE] [BACKSPACE] [BACKSPACE] [BACKSPACE]
[--IPADDR--] [SPACE] [SPACE] [SPACE] [SPACE] [SPACE] [SPACE] [LEFT] [LEFT] [RIGHT] [RIGHT]
The SYMBOLS/OKS1 keyboard is a bit different, but not really. “[–DONOTUSE–]” is really just a placeholder that won’t match any keyboard input, meant to use as a spacer to keep the eleven by five keyboard layout intact. Notice how I used [COMMA] here for the comma. I could have typed in an actual comma (,), and OSK would have converted it to [COMMA] automatically.
I defined the “–IPADDR–” keyboard layout header, but I didn’t bother defining what that does. If I end up needing to type in an IP address, OSK will just use the numbers from the upper or lowercase keyboards, and the dots from the SYMBOLS/OKS1 keyboard.
That defines the keys on the OSK.
Next on the configuration dialog is to define the Starting Key and the Submit Key. For XMBC, this is the “DONE” key, so just type DONE in each field.
Vertical and Horizontal Multi-Keyspan Priority Modes take a little bit of research to figure out how to set. Let’s say I wanted to use the OSK to type “cats and dogs”. After navigating to the “s” key, I need to go three left and two down to get to the spacebar. I then need to get to the “a”, but how does the keyboard work to get there? If I push the UP button, do I go back up to the “z” key, which is the key I came down to the spacebar from? No, I go up to the “u” key, which is the left-most key above the spacebar. This is what the Vertical and Horizontal Multi-Keyspan Priority Modes are for. For XMBC, Vertical should be set to “Top”, and Horizontal should be set to “Left”.
Finally, there is the Spirit Board Mode checkbox. When the checkbox is checked, the OSK will be in “spirit mode”. While in this mode, the keys will be navigated to, but the SELECT button will never be pressed. So, what you will see will be the cursor navigate to each key that would be pressed, pause for a short period of time, and then move to the next key to press. You should make sure that your keyboard will work before turning off “spirit mode”. If you don’t, who knows what keys the OSK will press. That is, heaven forbid that when you submit your text to type on the screen that the cursor somehow navigates to something that you don’t want it to go to, and magically presses all of the keys in the right order to delete all your pictures, or buy a pay-per-view package, or whatever.
Putting it All Together
Now that your OSK has been defined, we need to set things up so you can make it type. Create a new Action Group. Choose Type -> On-Screen Keyboard Options -> Do On-Screen Keyboard. Device -> Choose the device you defined. Click OK. Running this Action Group will invoke the OSK Automation keypresses against the text in the variable that you have defined.
Assuming you have a Control Page, add a new control to display the variable value for the variable that you have defined. Client Action: Popup UI Controls. Do not put a Server Action here, as that will kick off the action before the variable has been set. Instead, create a separate button that will invoke the do-on screen keyboard Server Action.
It is also possible to use a Trigger that will fire the server action when the variable changes. I didn’t set it up that way for fear that I set the variable and then didn’t want the OSK to fire for whatever reason.
Future Enhancements/Wish List
If somebody really wants/needs any of these, I can be persuaded to work on them (I will absolutely work for food!). These are some ideas I came up with that I consider “nice to have”, but don’t really impact the effectiveness of the plugin for my use. Sure, some of them may make the act of “typing” more efficient, but do I really care about saving another two seconds when I use the plugin? Not really. Plus, it’s entertaining to watch the way it is now.
1. Might be nice/required to configure the sleep time for Spirit Mode. Other users may need to have a longer or shorter sleep time between key presses. Not sure. I guess I will find out if I get any feedback on this.
2. Somehow, compute the most optimal way to make use of the keyboard. For example, if I’m trying to type a word that starts with an upper-case letter and is followed by a lower-case one, it’s probably better to make use of the Shift Key. However, if the word I’m trying to type has two consecutive upper-case letters, maybe it’s more efficient to use the Caps Lock key.
3. Add “Keyboard wrapping” as an option. That is, if you went left on the left-most key on the keyboard, the cursor may jump to the right side of the keyboard. It might be less keystrokes to wrap around the keyboard than to travel all the way across it.

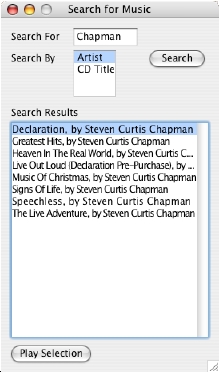 If she hits the “tab” key, the computer speaks “Search by Artist”. This is a list box, which can be changed to “Search by CD Title”.
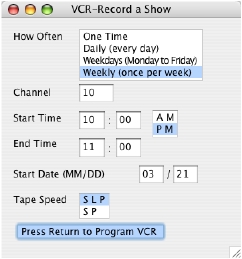 Finally, I’ve added one more really cool feature for Marie. Since Marie is a huge fan of the Thursday night lineup on TV, as well as all of the Law and Order shows, she’s always asking me to set the VCR to record this or that on TV. Unfortunately, we don’t have a talking VCR. (we do have a talking microwave, though) One of the neat things that the Slink-e does is to give the computer the ability to send IR commands out to control various devices like a remote control. Using TitleTrack Jukebox, I configured a remote control for our PROSCAN VCR. Then, I created a dialog box in Talking TitleTrack that Marie can bring up by hitting Command-R. This will announce “Program VCR: How Often: One Time”. Using the keyboard, Marie can fill out all of the information required to record her show. After all of the information has been entered in, Talking TitleTrack, via TitleTrack Jukebox, will send IR commands to program the VCR, just like I would enter it in using the remote control! I don’t know if Marie ever thought she’d be able to be able to program the VCR on her own again.
 weather report.” Nothing happened. She said it over and over, and nothing happened. I had her try one of the default commands “Computer, what time is is?” Nothing. She tried over and over, getting more and more frustrated, and couldn’t get it to work. Of course, it would pick my commands up immediately, which annoyed Marie even more.
 I posted my results to Rogue Amoeba’s forums, and they pointed me to an older plug-in called